MinMin Guard popular ad-blockers

What makes MinMinGuard different from other popular ad-blockers like AdAway is that it doesn't leave a blank space where the ad used to be. Instead, it removes the ad and replaces it with whatever the current app would ordinarily have in that spot. So instead of dead space, we gain screen real estate.


Step 1: Knock Out the Prerequisites

To install MinMinGuard, you will need to have a rooted and  Xposed Installer on your device.

Step 2: Install the MinMin Module

Once you have all three of those items, you can head over to the Xposed Installer, go to the Downloads section, and search for MinMinGuard.


Step 3: Select the Apps You Want to Remove Ads On

Head back to the MinMinGuard app, either through your app drawer or Xposed Installer, and select which apps you want to block ads for. I simply selected all (hit the square button with the four dots), as that's the easiest and fastest option.


Step 4: Enjoy Your New Ad-Free Mobile Experience

After you've checked the apps you want to remove ads from, reboot your device. Once back up, voilà, the ads are gone! Here are some before and after shots after enabling MinMinGuard on some of my most used apps.

For some applications, the changes will be a little more obvious, but the removal of the ads will always provide a cleaner look for the app.

 Download


Configuring Adblock Plus for Android

AdBlock Plus for Android.

  1. Go download the latest AdBlock Plus for Android from the official website.
  2. Open the APK on your Android device and tap install.
  3. Open the app, and make sure the Filtering switch is set to ‘on’. You can also uncheck the box for ‘Acceptable ads’ to block every single ad (by default, AdBlock Plus allows approved sites to show ads). 
  4.  https://update.adblockplus.org/latest/adblockplusandroid.apk

Getting started

Adblock Plus will automatically select a suitable filter subscription for you the first time it runs. You can still select any other subscription from the list.


Adblock Plus will run as background service and display its status in notification area.


Selecting a subscription

You can change subscription at any time by selecting it from a list:


 Instructions:

1. Go to the Android Market and search for the app “AdAway”.

2. After installing the app, start it up and hit the “Download files and apply ad blocking” button. This will  download a few host files and merge them into your phone’s, blocking those apps from ever reaching your device.

3. Reboot your Droid.

4. That’s it! You’ll now be running in an ad-free world!

Note: You can also disable ad blocking at any time, just go back to the AdAway app and click on “Disable ad blocking” button. Reboot to make the changes take effect.


Block Ads on Android


One of the best ad blocking solutions for Android devices is “AdAway”, which will block ads from most known sources. This includes ads in both your web browser and in the apps you use. AdAway uses a regularly updated blacklist to block the ads before they ever reach your phone. Keep in mind… you must have a rooted device for this app! What is root? Check out our lesson on that topic here: What is Rooting? The Advantages and Disadvantages

 Instructions:

1. Go to the Android Market and search for the app “AdAway”.

2. After installing the app, start it up and hit the “Download files and apply ad blocking” button. This will  download a few host files and merge them into your phone’s, blocking those apps from ever reaching your device.

3. Reboot your Droid.

4. That’s it! You’ll now be running in an ad-free world!

Note: You can also disable ad blocking at any time, just go back to the AdAway app and click on “Disable ad blocking” button. Reboot to make the changes take effect.


Cara Connect, beroperasi dan kontrol ponsel Android pada PC

1. ketika menghubungkan ponsel android ke USB, itu adalah esensi untuk Hapus centang USB debugging pertama. Ini dapat dilakukan dengan pergi ke 'Setelan' lalu mengklik 'Aplikasi', dan kemudian 'Pengaturan aplikasi' dan kemudian memilih 'Pembangunan' dan kemudian 'USB debugging.' 


2. kabel USB harus kemudian terpasang di ke USB Port pada laptop atau PC. Lambang USB ikon akan muncul. Hal ini menunjukkan bahwa perangkat berhasil diidentifikasi oleh PC atau laptop. Pada layar utama perangkat, menyentuh 'Terhubung USB'


Jika sambungan berhasil, maka perangkat harus muncul pada 'Perangkat dengan penyimpanan Removable' dari laptop atau PC.


Wondershare MobileGo adalah alat yang menyederhanakan mengendalikan hampir semuanya pada ponsel android dari laptop atau PC. Itu membuat mudah untuk mengirim dan membalas teks, mentransfer informasi kontak, memulihkan dan membuat cadangan file, memasang dan mencopot instalasi aplikasi, menemukan kontak duplikat, mentransfer foto, musik dan video.
It's worth dicatat bahwa sebelum Anda menikmati fitur ini menakjubkan dari Wondershare MobileGo, Anda perlu untuk men-download dan menginstalnya. Dapat mengoperasikan dengan mudah setelah terhubung melalui Wi-Fi atau kabel USB.

Mengirim dan menjawab teks/pesan

Wondershare MobileGo, sederhana untuk mengelola pesan atau teks pada ponsel android Anda dari laptop atau PC Anda. Hal ini memungkinkan Anda untuk mengirim serta Balasan pesan menggunakan komputer Anda disediakan ada hubungan yang sukses melalui USB atau Wi-Fi. Cukup penting, Anda dapat melihat Kapan pengiriman pesan, siapa yang mengirim dan juga memiliki pilihan untuk menyimpan pesan jika itu penting bagi Anda.  


 Memulihkan & Back Up 

fileAda sejumlah berbasis android aplikasi yang memberikan pilihan untuk memulihkan serta membuat cadangan file. Namun, sebagian besar aplikasi ini tidak ideal karena mereka lambat terutama selama operasi dan mengakibatkan hilangnya kontak penting atau data. Beberapa dari mereka juga memakan waktu ketika memulihkan dan membuat cadangan file. Semua komplikasi ini sempurna ditangani oleh Wondershare MobileGo 

Menggunakan Wondershare MobileGo Control Android pada PC

Seperti yang telah disebutkan pada awalnya, Wondershare adalah alat yang memungkinkan pengguna untuk mengontrol perangkat android mereka pada PC misalnya, memulihkan, mentransfer dan back up dari berbagai barang yang disediakan tidak terganggu koneksi melalui Wi-Fi atau kabel USB. 


Setelah berhasil men-download dan menginstal Wondershare MobileGo, Anda harus memastikan bahwa US Debugging diaktifkan. Untuk melakukan ini, merujuk pada langkah yang dijelaskan sebelumnya.


Download And Install Universal ADB Driver

Finding USB driver for your Android is almost a difficult task, if your smartphone or tablet manufacturer doesn’t provide a PC suite or if you don’t own a famous brand smartphone or tablet. To resolve this issue, today we are going to introduce an Universal ADB driver and installing it will let you to connect any of your Android device with computer successfully.

The Universal ADB driver given here is a windows based driver and it is compatible with almost all the Windows versions: Windows Vista, Windows XP, Windows 8, Windows 7, Windows 10 and Windows 8.1. Also, it supports almost all the Android smartphone and manufacturers in the world (Example: Samsung, Xiaomi, HTC, Panasonic, LG, Micromax, Intex, Lava, Gionee, InFocus, etc.)

How To Install Universal ADB Driver:

1) Before beginning the installation of Universal ADB driver, make sure that you have connected your smartphone to the computer using the original USB data cable as the ADB driver installer won’t detect your device, if you connect it after you begin the installation process.

2) To get started, download Universal ADB driver and extract its zip package to a folder in your computer. Now, you will find the “adbdriver_v1.0.exe” file. 

3) Now, click on it to launch the Universal ADB driver installer. 


4) Once the installer is launched, it will automatically detect your smartphone or tablet since you have already connected your smartphone with the computer


5) Now, you will be able to see your smartphone or tablet model number in the Installer’s device list. Also, you will see the message “Driver incorrectly” under “Device status“, which indicates that you haven’t installed the ADB driver in your computer.

6) Next, click on “Install” in the Universal ADB Driver installer to begin the installation process. Once you do that, you will get a Windows Security Prompt stating that they can’t verify the publisher of the driver. Just ignore it and click on “Install this driver software anyway” to install ADB driver in your computer.

7) After the installation is successfully finished, you will be able to see a green progress bar in the Installer along with the message “[Done] Installation Success“.
That’s it. Now you have successfully installed ADB driver for your android device in your computer.

Points To Remember:

1) The Universal ADB driver supports almost all Android devices. So, if your smartphone manufacturer doesn’t offer PC suite, then downloading and installing this will let you to connect your smartphone with the computer.

2) The Universal ADB driver installer is created by an XDA developer by the name drsmart and it is shared at his website ADB Driver Installer.


Root All Device

Installing a custom ROM is a great way to get the most out of your Android phone, but you need to find the right custom ROM for your device. Once you’ve found a custom ROM that’s right for your needs. The next step is to install it on your Android device.

There are different ways to install a custom Rom on an Android phone, like flashing in recovery mode or using an app, but the easiest way is through an app called ‘ROM Manager’.

ROM Manager is a must have app for Android root users who regularly tinker with their device’s ROMs. The app lets you flash your recovery to the latest and greatest ClockworkMod recovery. Besides that, it will help you to manage and install your custom ROMs and backing-up your current ROM.

It has both free and premium versions. The paid premium version includes additional features like automatic backups, web connect and incremental ROM downloads.

How to Install a custom ROM using ROM Manager

  1. First, download and install the ROM Manager app on your Android phone.
  2. After installing, launch the app and from the main menu, tap on ‘Flash ClockworkMod Recovery’.


3. You’ll be asked to confirm your phone’s model. Select your phone’s model and your phone will reboot and flashing CWM.

4. Now, before you go installing any custom ROMs, I suggest you to back up your current ROM. To do that, tap on the ‘Backup Current ROM’.


5. Give the backup a name and then click OK


6. You will be asked to allow ROM Manager superuser access, tap on ‘Allow’ to grant this. The backup process can take a little while, so make sure you aren’t expecting any important calls. 

7. Once done, reopen ROM Manager and tap on ‘Install ROM from SD card’


8. Find the folder where you placed the .zip file in. A box should pop up with three options like the image shown below


9. Tick the ‘Wipe Data and Cache’ and ‘Wipe Dalvik’ boxes, and then click OK. The phone will now reboot and start installing your custom ROM. This might take a little while, sometimes up to 15 minutes, so be patient and don’t panic if the device appears to have frozen.

Once the phone has booted up, you will be prompted to enter your Google account details. Congrats, you have successfully installed a new ROM and you now have a brand new ROM to explore!


Root your Android in seconds with KingRoot


Root your Android in seconds with KingRoot


In terms of functionality, in theory KingRoot can root almost any version of Android. According to its webpage it can handle everything from Android 2.X to 5.1. With respect to the models supported, it’s quite complicated to give a proper list, as a quick look around the Internet shows that the same users with the same smartphones and operating systems have different results. Luckily, the tool itself takes care of informing you about the efficiency of the process before doing it, as you’ll see below.

How Kingroot worksTo start,

 Kingroot is an app that takes advantage of Android’s vulnerabilities to do the root, which is why many antiviruses might deem it malware in the same way they would a keygen or a patcher, except that rooting your device is completely legal. Thus when you try to install the APK, the system will warn you that it’s a dangerous file even though it actually isn’t.

Once installed, you’ll come across a screen completely in Chinese that offers valuable information about how to proceed with the root. This is what it says:
Download : https://www.kingoapp.com/

  • (Below to the left) A rating out of three stars with the estimated success rate at the time you do the root on your Android.
  • (Below in the center) The estimated time that the process will take, broken down into minutes and seconds.
  • (Below to the right) The number of times that devices of the same model and with the same version of Android as the one running the app have been successfully rooted.
  • (Below everything) A blue button that will start the root process when pressed.


in the following screen you’ll see a progress percentage for the root process. In the lower part there’s a notice that it’s normal for the device to restart.


After the installation

The best way to see if the procedure has worked is to install the Root Checker app, which will check if your device is already rooted. It’s also advisable to install a permissions administrator tool like SuperSU that lets you limit the access that services and external tools request to run, since even though the app will auto-install the KingUser permissions manager, it will be Chinese to you, literally. As you’ll now be ‘unprotected’, it will do you well to have an app installed to confirm with you when an app tries to do anything weird with your permissions.


Ad Away For Android


What Does AdAway Do?


AdAway blocks advertisements from appearing anywhere on your Android device. You need to be rooted to use AdAway because it installs itself on the root layers of your system, blocking apps from appearing anywhere on your device.
Here are the core features of AdAway:

  1. Choose your own sources of host files (host files are the lists of blocked advertisers
  2. Add exceptions to your whitelist if a certain app isn’t working with certain hosts are blocked
  3. Define extra hostnames in your blacklist if some ads are sneaking through the filter
  4. Add your own hostname + IP pairs in the Redirection List
  5. Clean, modern UI which is extremely easy to use

How to Install AdAway

AdAway and its other advertisement blocking friends were recently removed from the Google Play Store. Google obviously doesn’t like it when an app can singlehandedly block something that earns Google billions of dollars per year.
Installing AdAway today is a bit more difficult. Here’s the step-by-step installation guide:
  1. Make sure your Android is set to allow app installations from unknown sources (i.e. sources outside the Google Play Store). You can enable this in Settings > Security or Settings > Applications. You might want to uncheck the unknown sources option after you’ve finished installation AdAway (you just need it enabled for the actual install part) 
  2.  Download and install a third-party app store called F-Droid on your device. F-Droid is officially affiliated with AdAway. You’ll need to sideload F-Droid: it comes in the form of an APK file. Download that APK file from here and place it into your device’s internal storage. Open the file manager on your device, find the APK you downloaded, and tap it to install it.
  3.  Open the F-Droid app on your Android device and it will begin scanning your device for compatibility. Once the scan is complete, search for AdAway from inside F-Droid. Find it, download it, and install it.
  4.  Open AdAway and give it root access. After granting root access, you’ll need to press the Download files and apply ad blocking button. AdAway will go to work, modifying host files and blocking advertisements.
  5.  Restart your device to complete the installation process.
After restarting, all of the ads you see in YouTube, messaging apps, games, and other apps will have disappeared. That’s it!


How To Make Money With Mobile or Android


This application can only be used in mobile phones or android tab only, so if you are an iPhone user apologize today whaff still can not be used.How do I earn money with the whaff RewardHow to get a whaff of reward money is actually quite easy, but first you need to install the Application whaff on your Android device.You can download in  Google Play Store


After you download and install whaff on your android device, please log-in there you use the ID and password from your Facebook.


How to use a whaff
After successful log-in you will be prompted to enter the Invite Code, you can use the Invite Code
Code DC89040


By using the code you will receive a cash balance of $ 0.30 automatically.
But if you do not enter or not using the code you will not receive the bonus, so you keep your balance $ 0.
"So my advice to use Code DC89040, I also received the same benefits as you receive, this in return because I have to tell you how to make money by using a whiff, and you receive the same reward for using the invite code DC89040"
Once you enter the code and get a bonus, now is the time you look for money to download the application.
Premium picks


Uang Dari Android

Cara untuk mendapatkan uang dengan whaff reward sebenarnya cukup mudah, tapi sebelumnya anda harus menginstal Applikasi Whaff di perangkat Android sobat.Sobat bisa download di  Google Play Store


Setelah anda download dan instal whaff di perangkat android anda, silahkan log-in disitu anda menggunakan ID dan password dari Facebook anda Fungsinya hanya untuk konenksi ke akun kita untuk data di Profil.
Setelah sobat berhasil log-in sobat akan diminta untuk memasukkan Invite Code, Invite Code bisa anda gunakan Code DC89040 (Dengan menggunakan code tersebut balance/saldo anda akan menerima uang sebesar 30$ secara otomatis (terakhir saya coba udah naik jadi 30$) dengan menggunakan kode whaff DC89040. 
jadi nggak ada yang rugi kan,Tapi jika anda tidak memasukkan atau tidak menggunakan code tersebut anda tidak akan menerima bonus tersebut, jadi balance anda tetap 0$.)


Premium picks.
 
Di premium pick akan ada beberapa applikasi yang perlu anda download dan anda mainkan setiap harinya untuk mendapatkan uang dollars. Anda hanya perlu memainkan applikasinya sekitar 2-5 menit setiap harinya melalui Whaff.
Dan anda akan mendapatkan tambahan rewards jika anda tidak meng-uninstall applikasi tersebut selama yang ditawarkan.
Selain premium picks, silahkan download Applikasi yang ada di Whaff Picks untuk mendapatkan uang Dollars.


 Root Your Android Device with Kingo Android Root

Root Your Android Device with Kingo Android Root

Kingo Android Root offers every Android user the easiest one-click method to root any Android devices. How to use this universal Android root software to root your Android device? Here we go.
Make sure you get everything right beforehand.
  • Device powered ON
  • At least 50% battery level
  • Internet connection necessary
  • USB Cable (the original one recommended)


Step 1: Free download and install Kingo Android Root.

Kingo offers the best one-click Android root software for free. Just download and install it now.

Step 2: Double click the desktop icon of Kingo Android Root and launch it.

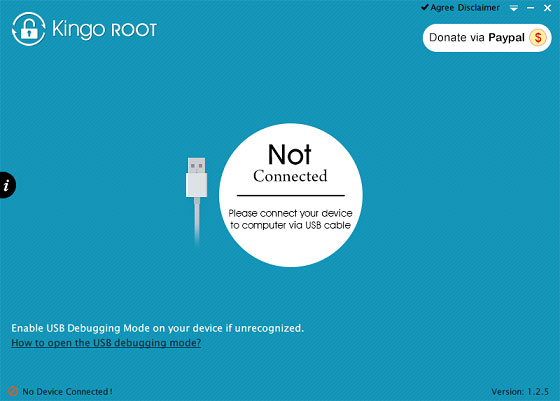
After launching Kingo Android Root, you will see its interface as shown below.

Kingo Android Root-Device not Connected

Step 3: Plug your Android device into your computer via USB cable.

If your device driver is not installed on your Computer, Kingo will install it for you automatically. Make sure you get Internet conenction so that device driver can be downloaded. If you are using Windows 8, you may need to change some settings first. When running Kingo Android Root on Windows 8, the issue you may most likely encounter is driver installation looping.
  

Step 4: Enable USB Debugging mode on your Android device.

USB Debugging mode enabled is a necessary step of Android rooting process.


INPORTANT: Pay attention to your device screen for a prompt window. Tick "Always allow from this computer". If you don't, you will probably get yourself an OFFLINE DEVICE.

Kingo Android Root-Device not Connected

Step 5: Read notifications carefully before rooting your device.

Android rooting is nothing big. However, it is not exactly a small issue either. Rooting your device may open a door for you, and yet with risks.
Android rooting is a modification process to the original system, in which the limitations are removed and full-access is allowed and thus resulting in the ability to alter or replace system applications and settings, run specialized apps and even facilitate the removal and replacement of the device's operating system with a custom one. Rooting your device will immediately void your warranty...  Click to know more about Android Rooting.

Step 6: Click "ROOT" to root your device.

Kingo Android Root will employ multiple exploits on your device, which will probably take a couple of minutes. In the rooting process, your device may be rebooted several times. Do not be panic, it is perfectly normal. And once it begins, please DO NOT touch, move, unplug or perform any operation on your device.

Kingo Android Root-Device not Connected


Step 7: Root succeeded.

Hopefully your device is well supported and successfully rooted by Kingo. Until your device reboots itself, do not operate.
Kingo Android ROOT

Step 8: Check the root status of your device.

Normally, you will find an app named "SuperUser" installed on your device after successful rooting.

New Root Framaroot


Now you can root your android device without PC, just use framaroot. This app including several exploits named as the heroes of the book "The Lord of the Rings" Gandalf, Boromir, Pippin, Legolas, Sam, Frodo, Aragorn and Gimli. You can install Superuser and su binary on phone or tablet from android version 2.x to 4.x. All compatible devices can be found here. Unroot also very simple, just use this option in framaroot application.
Compatibility for Qualcomm devices (Gandalf exploit only) :
  • ASUS Memopad FHD 10 LTE
  • Asus Padfone 1/2
  • Asus Padfone A66
  • Asus Padfone Infinity
  • Asus Transformer Pad Infinity TF700KL
  • Archos 50 Platinum
  • BLU Studio 5.3 S
  • BW T18+ (Fortis Evo)
  • Cloudfone Thrill 430x
  • Disgo 8400g
  • DNS S4504/S4503/S4502
  • FAEA F1
  • Gigabyte GSmart G1315 Skate
  • Gigabyte GSmart Rio R1
  • Google Nexus 4
  • Highscreen Spark/OMEGA Q/Blast/Strike/Boost
  • Hisense AD683G
  • HTC One S
  • Huawei Ascend G330D U8825D
  • Huawei Ascend G526
  • Huawei Honor Pro (U8950-1)
  • Huawei Premia 4g
  • Huawei U8815/U8816 Ascend G300/G301
  • Huawei U8825D Ascend G330D
  • Huawei Vitria Y301-A2
  • Huawei Y215
  • K-TOUCH TITAN S100
  • Karbonn Titanium S5
  • Kyocera Hydro Edge
  • Kyocera Hydro Xtrm
  • Kyocera Torque
  • Lenovo A600e
  • Lenovo A706
  • Lenovo S870E
  • LF-LTE3 (F260S)
  • LG Nitro HD
  • LG L1 II
  • LG L7 II P700/P710/P714/P715/P870
  • LG Lucid 2 (VS870)
  • LG Optimus Dynamic 2
  • LG Optimus F5 (P875)
  • LG Optimus F7
  • LG Optimus G E970/E975
  • LG Optimus L3 II E425
  • LG Optimus L5 E610/612/615
  • LG Optimus L7 II P710/P713/ P714/P715
  • LG Optimus L7 P700/Р705
  • LG Optimus LTE 2
  • MEDION LIFE P4013
  • Micromax A111 Canvas Doodle
  • Motorola Defy Mini XT321
  • Oppo Find 5
  • Orange Nivo
  • Orange Yumo
  • Orange Zali
  • Pantech Discover
  • Pantech Flex
  • Pantech IM-A840S Vega S5
  • Pantech Sky S5 A840S
  • Pentagram Combo
  • Phicomm i370w / i600 / i800
  • Samsung Galaxy Core i8260
  • Samsung Galaxy Express GT-I8730
  • Samsung Galaxy Win I8552
  • Sharp Aquos Phone SH930W
  • Smartfren Andromax U
  • Smartfren Andromax i2
  • Sony Xperia E C1505/Dual C1605
  • Sony Xperia L C210X
  • teXet TM-3204R
  • teXet TM-4677
  • Xiaomi Mi-2S
  • Yarvik Ingenia Compact SMP35-200
  • ZTE T83 (Telstra Dave)
  • ZTE V880G/ZTE V955
  • ZTE V9815 Grand Memo N5
  • ZTE Warp Sequent
Compatibility for MTK devices (Boromir, Faramir and Barahir exploits only) :
  • A8 Alps
  • Acer A1-810
  • Acer A1-811
  • Acer B1-711
  • Acer Iconia A3-A10
  • Acer Liquid E2
  • Acer Liquid Z3
  • Alcatel 975N (Vodafone Smart 3)
  • Alcatel OT 4030D S'POP
  • Alcatel OT 8008D Scribe HD
  • Alcatel OT 997D
  • Alcatel OT Fierce
  • Alcatel OT Idol 6012X / Le Mobile Sosh / Orange Hiro
  • Alcatel OT Idol 6030X/6030D/6030H
  • Alcatel OT Scribe Easy 8000a
  • Alcatel OT Star 6010X
  • Alcatel OT Pop C5
  • Alcatel OT Ultra 6033x
  • Alcatel OT X'Pop 5035D
  • Amoi N828
  • Archos 40 Titanium
  • Arc Mobile 350D
  • ASUS Memo Pad HD 7
  • atab4w
  • AVUS A24
  • BEDOVE X12
  • Blu Dash 5.0
  • Blu Life Play
  • BLU ONE X
  • BLU Studio 5.0 / 5.5 / 5.5S
  • BQ Aquaris 5 / 5.7
  • BQ Elcano
  • Brondi Glory 2
  • Cat B15
  • Changhong z9
  • Charmpin (UTime) G7
  • Cherry Mobile Amber
  • Cherry Mobile Burst 2
  • Cherry Mobile Cosmos S
  • Cherry Mobile Cosmos X
  • Cherry Mobile Omega XL
  • Cherry Mobile Thunder 2.0
  • Chinese Star S7589
  • Chuwi VX1
  • Coolbox Quore v57
  • Coolpad F1 (8297)
  • Cube U39GT 3G (CubeTalk 9)
  • Cube U51GT C4
  • Cube U55GT (CubeTalk 79)
  • Cubot A890
  • CUBOT GT90 / GT99
  • CUBOT ONE
  • CUBOT X6 / P6
  • DAXIAN XY100S
  • Doogee DG200 Hotwind
  • Doogee DG350
  • Evercoss A7S
  • Excelvan ET704
  • Explay HD Quad
  • Explay infinity II
  • Explay Polo
  • Explay Surfer 7.32 3G
  • Explay Surfer 8.31 3G
  • Explay X-Tremer
  • Feiteng H5W (GT9000W)
  • Fly IQ440 Energie
  • Fly IQ441 Radiance
  • Fly IQ442 Miracle
  • Fly IQ443 Trend
  • Fly IQ446 Magic
  • Fly IQ450 Quattro Horizon 2
  • Fly IQ451
  • Gionee 868H
  • Gionee E7 mini
  • Gionee Elife E3
  • Gionee GN 708
  • Gionee Pioneer P2
  • GoClever Fone 570Q
  • GoClever Quantum 4
  • GoClever Tab M713G
  • Goophone N3
  • GSmart Aku A1
  • GSmart Sierra S1
  • GuoPhone G9002
  • Haier W718
  • Haipai I9389
  • HDC I9500/N9006
  • Highscreen Alpha GTX
  • Hisense U970
  • HKC Q79 3G
  • Hosin v70
  • Huawei U8836D G500 Pro
  • Huawei G610-U00 / G610-U20
  • Huawei G700-U10 / G700-U20
  • Huawei Ascend G730
  • Huawei Y320
  • Huawei Y511
  • HTM A6
  • HTM M1/M3
  • HUMMER H1+
  • iBall Slide 3G Q1035
  • IconBIT NetTAB Space 3G Duo
  • IconBIT NetTAB Mercury Q7
  • I-mobile series I-style 7.2
  • Inco Colossus II
  • INEW I6000+
  • iNEW V3
  • Intex Aqua HD
  • iOcean X7
  • iWING WTD2
  • Jiake JK 11
  • Jiayu F1
  • Jiayu G2
  • Jiayu G3S
  • Jiayu G4
  • Just5 Spacer
  • Karbonn A1 / A30 / A9+
  • Karbonn Titanium S2
  • Kata i3
  • Kata Venus 3
  • KENEKSI Beta
  • KingTopKt07
  • Kvd N3+
  • LANIX ILIUM S600
  • Lava iris 405 / 503
  • Lenovo A3300
  • Lenovo B8000-H
  • Lenovo 10.1" Tablet S6000
  • Lenovo IdeaPhone P700i
  • Lenovo IdeaPhone S720
  • Lenovo IdeaTab A3000-H
  • Lenovo IdeaTab S6000-H
  • Lenovo P770/P780
  • Lenovo S890, S720, S820, S920, A390, A850, A516, A656, A368i, A369i, A859
  • Lenovo S5000-H
  • Lenovo S6000-F
  • Lenovo Yoga 8 / 10
  • Le Pan TC802a
  • M-Pai 809T
  • M4tel SS1060
  • Mi354 "Spice Smart Flo Space"
  • Micromax A58
  • Micromax A89 Ninja
  • Micromax A90
  • Micromax A114 / A117
  • Micromax A115 Canvas 3D
  • Micromax Canvas 2 Colors A120
  • Micromax Canvas 2 Plus
  • Micromax Canvas 4 A210
  • Micromax Canvas EGO A113
  • Micromax Canvas HD
  • Mlais MX70
  • MoreFine S6 Pro
  • Motorola RAZR D1
  • Motorola RAZR D3
  • MSI primo 76
  • MyPhone Agua Iceberg
  • Mysaga C2
  • N800 Mini Note
  • Neken N6
  • NEO N003 Advance
  • Newman N1 / K18
  • Nexa Vega N4
  • NGM Forward Prime
  • NGM Forward Young
  • NGM Dynamic Racing GP
  • No.1 S7
  • Omate TrueSmart
  • Onda v819 3G tablet
  • OPPO Find Clover
  • Oppo find 5 mini
  • Oppo findway U7015
  • OUMEI X5
  • Overmax Vertis-01/01+
  • Overmax Vertis-02/02+
  • Pantech Vega LTE Ex (IM-820L)
  • Pearl Smartwatch AW-414
  • Philips W536
  • Philips W736
  • Phoenix Rockx1
  • PocketBook SURFpad 3
  • Prestigio Multipad 4 Quantum
  • Prestigio MultiPhone 4055
  • Prestigio MultiPhone PAP 3350/3400/4505/5044 DUO
  • Runbo x5 / x6
  • S09 W63 IP68
  • Sesonn N9200+
  • Sharp AQUOS SH837W
  • Shengda S4
  • Sky Vega A800S
  • Smartfren Andromax V
  • Star HD9000+
  • Star N8000
  • Star N9800
  • Star S5 Butterfly
  • Star S6
  • Star S9500
  • Starmobile Diamond V3
  • Starmobile Knight
  • Symphony Xplorer ZII
  • Tecno R7
  • TeXet NaviPad TM-7055HD
  • Texet TM-5277
  • THL T100S / T200
  • THL V12
  • THL W8 Beyond
  • THL W8S
  • THL W11
  • THL W100(S) (130711)
  • THL W200(S)
  • Tronsmart TS7
  • Ulefone u7
  • Utime U100S
  • Vonino Ego QS
  • Vonino Sirius QS
  • Xiaocai X9
  • Xiaomi Hongmi / Redmi
  • Xolo A600/Q700/Q800/Q3000
  • Zen Ultrafone 701HD
  • ZOPO 980/990
  • ZOPO C2 Platinum
  • ZOPO C3
  • ZOPO ZP910
  • ZOPO ZP300+ / ZP500+
  • ZOPO ZP900 Leader
  • ZOPO ZP950H
  • ZOPO ZP990+
  • ZOPO ZP998
  • ZTE BLADE G2 V880H
  • ZTE BLADE Q
  • ZTE BLADE Q MAXI / MINI
  • ZTE Kis
  • ZTE Leo S1
  • ZTE N986
  • ZTE Open
  • ZTE Roamer 2
  • ZTE V795
  • ZTE V880G/H
  • ZTE V967S
  • ZTE V987 Grand X Quad
  • Walpad
  • Walton Primo F3i / G1 / H2 / EF
  • Wiko Cink Peax 2
  • Wiko Darkfull
  • Wiko Darknight
  • Wiko Darkmoon
  • Wiko Iggy
  • Wiko Ozzy
  • Wiko Rainbow
  • Wiko Stairway

Compatibility for Huawei K3V2 devices (Pippin exploit only) :
  • Huawei Ascend G615
  • Huawei Ascend Mate
  • Huawei Honor 2
  • Huawei MediaPad 10 Link
  • Waiting feedbacks ...

Compatibility for AMLogic devices (Gollum exploit only) :
  • Waiting feedbacks ...

Compatibility for Samsung devices (Legolas and Aragorn exploits only) :
  • Samsung Galaxy Core GT-I8262
  • Samsung Galaxy S Aviator
  • Samsung Galaxy Proclaim S720C
  • Samsung Galaxy Young GT-S6312/GT-S6310
  • Samsung Illusion SCH-I110
  • Samsung Lightray SCH-R940
  • Waiting feedbacks ...

Compatibility for Exynos devices (Sam, Frodo, Legolas and Aragorn exploits only):
  • AT&T Galaxy Note 2 SGH-I317
  • Highscreen Explosion
  • Hyundai T10
  • Hyundai T7s
  • Impression 9702 (Exynos 4412)
  • Lenovo K860/К860i
  • Newman N2
  • Meizu MX2
  • Samsung Galaxy Camera EK-GC100
  • Samsung Galaxy Note 10.1 GT-N8000, GT-N8010, GT-N8013, GT-N8020
  • Samsung Galaxy Note 2 GT-N7100
  • Samsung Galaxy Note 2 LTE GT-N7105
  • Samsung Galaxy Note 8.0
  • Samsung Galaxy Note GT-N7000
  • Samsung Galaxy S GT-i9000
  • Samsung Galaxy S2 AT&T SGH-I777
  • Samsung Galaxy S2 Epic 4G Touch - SPH-D710
  • Samsung Galaxy S2 GT-I9100
  • Samsung Galaxy S3 GT-I9300
  • Samsung Galaxy S3 LTE GT-I9305
  • Samsung Galaxy Tab Plus GT-P6200/GT-P6210
  • Samsung Galaxy Tab 7.7 GT-P6800/GT-P6810
  • Samsung SGH-i997 Infuse 4G
  • T-Mobile Galaxy Note 2 T-889
  • Verizon Galaxy Note 2 SCH-I605
  • iBerry Auxus CoreX2 3G and CoreX4 3G

Compatibility for Omap36XX devices (Gimli exploit only) :
  • Archos Gen8
  • Cliq 2 MB611
  • Coolpad Quattro 4G
  • Droid 2 (a955)
  • Droid 2 Global (a956)
  • Droid X (MB810)
  • LG Marquee LS855
  • LG P970 Optimus Black
  • Motorola DEFY+ (MB525 / MB526)
  • Motorola Droid PRO
  • Motorola Droid X
  • Motorola Milestone 2
  • Motorola XPRT
  • Parrot ASTEROID Smart
  • R2D2 (a957)

How to install:
1. Download Framaroot from our site http://framaroot.net/
2. Run, choose Superuser or SuperSU
3. Select Boromir or another character
4. You will see :-)
5. Reboot device
6. Root- installed